Installation guide for Multi-Flex, Oak-Flex and Maple-Flex dance floors systems
- Bundles of wood flooring
- Special joint adhesive
- Mini tool kit
- 6 mil polyethylene
- Duct tape
- Electric circular saw
- Utility knife
Ensure that concrete subfloors contain less than 5% moisture content. All subfloors should be clean and level to 1/8” deviation within a 10 foot radius. The rule of thumb is to run the length of the wood flooring with the length of the room, always lead with the tongue side of the wood. Remove any existing baseboard, molding or doorway thresholds. These items can be replaced after installation. For installation over concrete subfloors loose lay 6 mil polyethylene underlayment, lapping the joints a minimum of 6" and sealing the joint seams with duct tape. The 6 mil polyethylene must run up the wall at least as high as the finished floor. Always run the Polyethylene along the short dimension of the room. Inspect each piece of wood flooring prior to installation.
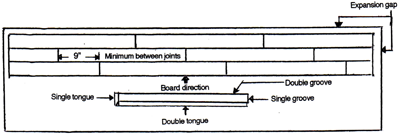
Expansion gaps must be allowed along the perimeter dimensions of the room, 5/8 "for width up to 40’, add 1/8" additional expansion for each 10' increase in the overall width of the floor area. Temporary blocks or wedges should be placed between the first row of boards and the long and short side dimensions of room. Stagger all plank head joints at least 9" to create a random pattern. Always start the first row with a full plank. Keep all cut pieces, 9" or longer as they may be used to either start or finish subsequent rows. Glue all joints. Use holding frame for boards when applying joint adhesive. Wipe off excessive joint adhesive at once with slightly damp rag after putting boards together. The best way to install the subsequent rows is to pound them into the starter rows with the Tapping Iron tool. Make sure that boards are tight. You may need to cut the boards of the last row length wise to accommodate the dimension of the wall, but remember to cut enough to allow for the same size expansion gap that you left on the other side of the room. Glue the last row to the row before it and install blocks between it and the wall until the glue has an opportunity to harden. Remember to remove all temporary blocks or wedges to allow for expansion. (For the #800 Multi-Flex Floor Only): After floor is complete, all and any joint ridges that exist must be sanded completely smooth before vinyl dance floor surface is laid. Make sure the floor surface is completely clean after sanding.