Installation Guide for #500 Springflex Hardwood Dance Floor Systems
Before you begin installing your Springflex floor, read the instructions from start to finish. If you have any questions, contact Dance Equipment International at 1-408-267-1446. These instructions can be printed directly from your web browser.
Section A: Tools & Materials List:
What you will receive from us:
- Bundles of wood flooring
- Foam underlayment
- Installation clips
- Header joint adhesive
- Poly Vapor underlayment
Tools you will need:
- Hammer (non-rubber)
- Saw
- Chalk-line
- Duct tape
- Wall spacers
- Crow bar
- Tapping block
- Pull tool
- Broom
Section B: Pre-Installation Site Inspection
1. Subfloor Moisture Testing of Concrete
Springflex can be installed in rooms with normal humidity levels on sub-floors that are firm, level, and dry. To determine if a concrete subfloor is dry, several methods can be used: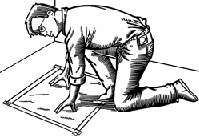
Method A: Place a sheet of plastic film on the surface of the subfloor and seal the edges with duct tape. If, after 24 hours, condensation or darkening does occur, refer to Method B.
Method B: Should method A exceed tolerance, a 72-hour calcium-chloride test needs to be conducted on the concrete subfloor (ASTM F-1869). For emission levels of up to 6lbs. of pressure, use Polyfelt with fully taped seams. For levels up to 10lbs., use 6mil. plastic underneath as a secondary moisture barrier with fully duct-taped seams. For readings in excess of 10lbs., corrective measures must be taken in order to successfully install Springflex. See section E. figure 1 for additional information on Secondary Vapor Barrier.
Section C: Preparing For Installation
1. Subfloor Tolerance:
Subfloors can be any firm surface such as concrete, plywood, sheet vinyl, or smooth tiles, etc. Surface variation should not exceed 3/16" within a ten-foot radius. To Determine flatness of the subfloor, use the edge of the Springflex flooring board. Correct minor low spots by filling with tar paper or roofing felt. Extensive low spots may require a leveling compound. Scrape, sand, or grind any high areas.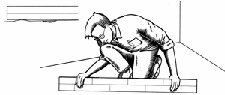
2. Clean the Subfloor
Scrape subfloor clean and sweep up all debris from construction. Any debris left on the floor could compromise the secondary vapor barrier, in the event that subfloor moisture requires an additional layer of 6 mil. plastic.3. Determine the Direction of Installation
Decide which direction your flooring will be installed. The rule of thumb is to run the length of the flooring with the length of the room. Other considerations are to install planks parallel to the incoming light source or parallel to the direction of traffic flow.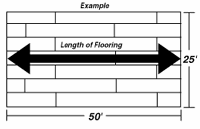
Section D: Expansion and Contraction Planning
1. Planning for Expansion
It is vital in the planning of the job layout that you understand the unique nature of the Springflex product. This is not a veneer product (plywood); it is solid wood throughout. Always allow for proper expansion space around the perimeter of the floor. the rule is 1/4" expansion space for every 10 feet of width ON BOTH SIDES! The rule for expansion on the length is 1/8" for every 10 feet of length on both ends.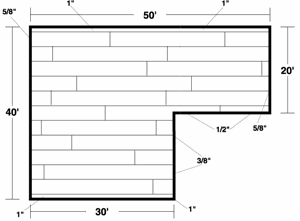
2. Expansion Space -- Doing the Math
To calculate the correct expansion space for width of floor use the following table:Expansion Formula = 1/4" per 10 foot span each side -- 1/2" per side minimum.
20 ft. span = 1/2" expansion per side
30 ft. span = 3/4" expansion per side
40 ft. span = 1" expansion per side
50 ft. span = 1 1/4" expansion per side
3. Preparing for Expansion Needs
Remove any existing baseboard, molding or doorway thresholds. These items can be replaced after installation. Door casings should be undercut and notched out to avoid difficult scribe cuts and provide for proper expansion space. This is easily done by placing a flooring board on top of the Poly Plastic against the frame and sawing the door jamb. The flooring can then slide under the door frame.Section E: Underlayments
1. Secondary Vapor Barrier
Should the preliminary moisture tests exceed specifications, an additional layer of 6 mil. plastic is required. Run plastic 4" up wall and tape in place with 3M blue painter's tape. Overlap plastic 8" and tape seam with duct tape. Lay plastic in opposite direction of the first layer of Poly Plastic to minimize where joints line up. Run line of duct tape on seam where plastic meets subfloor and at a surface seam after lapping seam 8 inches.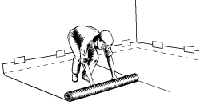
2. Installing Poly Plastic
Loose lay the Poly Plastic. Overlap the seam and seal the seam along its entire length with duct tape. Extend Poly Plastic 4" up the wall and tape in place with 3M blue painter's tape to hold it up and out of the way. This extra material will create the tuck necessary to guard against moisture invasion through the perimeter walls. Should the floor have a plastic membrane under the Poly Plastic, it should be tucked and trimmed as well (See G-4). Note: Make sure you trim your expansion cavity high enough to accommodate all the material that will be involved in the tuck.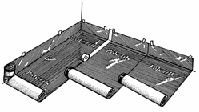
Section F: Pre-Installation Material Inspection
1. Inspect Material
Examine all material for any defects before installation. Should any defects be present, STOP THE JOB and contact your representative right away. Do not install any plank that is obviously defective. We strive to make a product that is second to none in quality. However, the time to correct a possible defect is before the material is installed.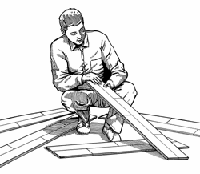
Section G: Installing Quick-Clip System
1. Starting Line
Choose a long straight wall as your starting wall To start your first row of boards, tack and stretch string 1/2" away from wall, and 1/2" above surface of the floor height. The string acts as a guide to help keep the boards in a straight line.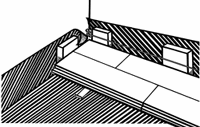
2. Expansion Space
A minimum space of 1/2" must be left along all perimeter walls and other vertical obstructions. Extra large rooms or wide runs of flooring will require larger expansion gaps. For runs wider than 20 feet see section D-2.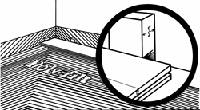
3. Tuck and Wrap
It is important to protect the edge of the floor from moisture invasion at exterior walls. Untape the Poly Plastic and secondary vapor barrier (if one was required). Take a scrap of flooring and gently push the under-layment into the cavity. Lay your row of flooring to where you want the edge to be according to your expansion needs.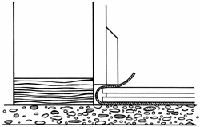
4. Cut Tuck Remnant
Cut off excess material from tuck-and-wrap process. Remember to check your clearance to insure floor can easily move in and out of expansion cavity. Make sure clearance is uniform around entire perimeter. A high area of the slab could result in a section of the floor not being able to move freely.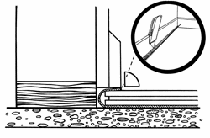
5. Irregular & Out-of-Square Walls
If your starting wall is irregular or out of square, scribe and cut the first row of boards to match variations. A simple scribe can be made by drilling a pencil-sized hole 1/2" in from an expansion spacer. Use as shown in the illustration.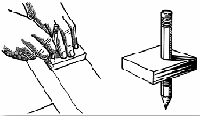
6. Starting Row
Begin in the left-hand corner with a full uncut plank. Lay the plank upside down and hammer the end of the clip with the holes into the clip groove (slot) on the underside of the plank. The long end of the clip without holes must project in the direction of the tongue.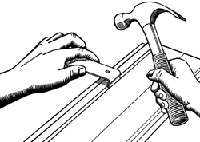
7. Clip Spacing
The distance between the clips should be about 18" on center (four clips per six foot plank). The first and last clip at the end of each row must be 2" to 4" from the wall.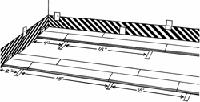
8. Clip Planks Together
Glue and place the end joints together first; then use a hammer and tapping block against tongue to tap boards firmly together along the length. When the planks are tight, press down on the plank to engage the clip. To effectively seat the end joint, tap board into place starting at its open end and tapping back along its length into the floor. Note: Do not strike the edge of the board with the hammer or drive boards together too hard. This avoids damaging the edges of the board.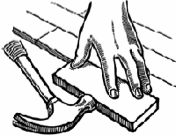
9. Glue the End Joint
Once the clips are in, turn the plank right side up and install the first board with the groove side towards the starting wall. The tongue side will be away from the wall with the long arm of the clip exposed. Apply Header Joint Adhesive to the inside bottom of the end joint groove (as shown) and repeat with succeeding boards to complete first row.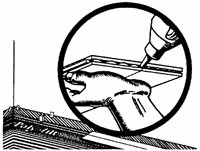
10. Starting Next Row
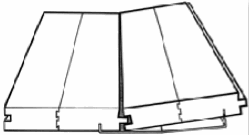
To start the next row of boards, begin with the cut piece left over from the first row (if cut piece is under 16", cut 16" or more from a full plank to stagger the end joint). This end-gap spacing is critical to the structural integrity of the floor. Spacing end joints 16" or more creates a proper interlocking strength for the floor. To prevent clips from touching each other, alternate them (in line) by approximately 2" back and forth as you proceed across the floor.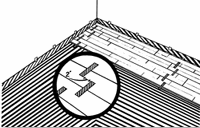
11. Clip Spacing at Corners
Clips need to be doubled up at places where the floor turns a corner or goes through a doorway. It is also important to narrow the clip spacing to 12"-14" and place clips within 2"-4" at ends when you go through a narrow aisle way. Using this method in narrow aisle ways will help prevent gaps from occurring.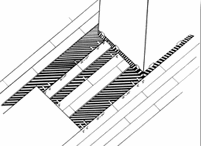
12. End Joint Spacing
To create a random pattern, stagger end joints of boards by at least 16" and strip joints by at least 3". The staggered pattern is critical to the structural integrity of the floor.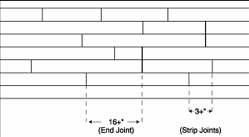
13. Fitting Last Row
Cut the last row of planks as needed to fit in the remaining space. Remember to allow for the expansion gap at the wall. If needed, the width of the last row of planks can be scribed with a pencil as pictured in section G, figure 5.14. Installation of the Last Row
The final ripped down board must be glued to the preceding row by applying Header Joint Adhesive along its length (side). This is the only exception to applying Header Joint Adhesive to the length (side). Do not apply Header Joint Adhesive to the sides (length) of the boards anywhere else.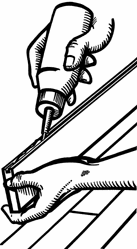
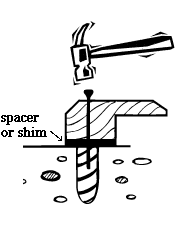
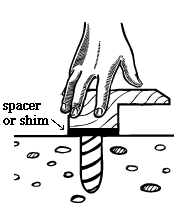
15. Snugging Last Board
Cut the last board to proper length and use a crowbar to snug up the last board. Use a shim against the wall to avoid damage to the wall. Make sure all joints are tight and proper expansion space is left between all walls and completed floor.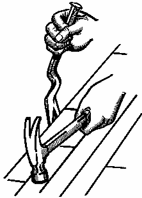
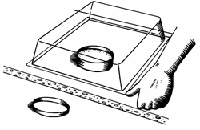
16. Radiator Pipes
If the room has pipes or radiators, drill a hole large enough to fit around them with space for expansion. Then saw diagonally away from holes (as shown). Fit board around pipe or feet of radiator and replace cut away piece.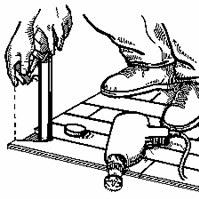
17. Securing Moldings
It is vitally important to secure moldings in a fashion that does not impede the ability of the floor to move. Transition moldings should never be fastened to the surface of the floor. The correct methods are to secure the transition molding to the subfloor by the use of nails, two-part epoxy, liquid nails, or construction adhesive and nails.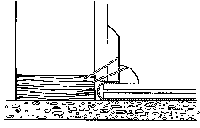
Section H: Molding, The Finishing Touch
Lip-Over Reducer:
For transition from flooring to existing floor.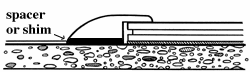
Special Note:
Do not attach any transition moldings directly through the lip-over part of the molding. The transition molding is secured by the use of epoxy or liquid nails or fastened with a nail directly to the subfloor. This is critical since Springflex is a floating system and the movement of the floor is not to be impeded or restricted in any way.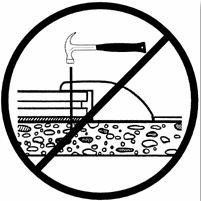
Moulding Installation:
Note: This method only applies to installation over concrete. For installation over wood subfloor follow instructions 4 through 6.
1. Drill Hole with 7/16" masonry drill bit.
2. Insert Header Joint Adhesive into hole.
3. Tap 1/2" wood dowel into hole.
4. Place two part epoxy, liquid nails, or urethane glue on concrete slab.
5. Press molding into adhesive.